Kickstart and PXE Server
Configuration of Kickstart and PXE Server in
RHEL6
Server
IP settings
IPADDR
192.168.0.70
SUBNET
255.255.255.0
NM_CONTROLLED=no
ONBOOT= yes
BOOTPRO=none
DNS1=192.168.0.1
Kickstart
file is used to install the OS at different client machine without providing
the entries which are asked during the installation of OS.Kickstart file should
be created in the location os is copied and can be accessed over the network.
Install the kickstart package.
Yum
install system-config-kickstart
Install
the kickstart package.
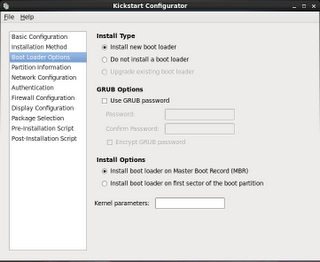
Run the kickstart utility.
system-config-kickstart
In the second last option
you can remove text mode installation option and opt For a graphical one.
Select the http
installation method
Use the defaults.
In
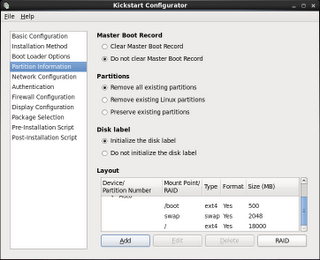
the disk label option choose the first option (Initialize the disk label).
The
partitions that I have created are like this.
Mount
Point
type size
/boot
ext4 500
Swap
swap
2048
/
ext4
18000
Make sure that SELinux option is disabled and Security level
is set to Disable firewall.
Save
the ks.cfg file to the filesystem.
PXE Server Configuration
# Install all the required packages through yum
[root@server~]#Yum
install syslinux xinetd* tftp-server dhcp httpd -y
[root@server~]#mkdir
/var/lib/tftpboot/pxelinux.cfg
[root@server~]#cp
/usr/share/syslinux/pxelinux.0 /var/lib/tftpboot/
[root@server~]#vi
/etc/xinetd.d/tftp
#
Open the xinetd settings to enable tftp server.
#
at line 14 set the parameter to no from yes.
Disable=no
[root@server~]#service
xinetd restart
[root@server~]#chkconfig
xinetd on
Add the following code to dhcp server in
global section
[root@server~]#
vi /etc/dhcp/dhcpd.conf
#
Global Options
Allow
booting;
Allow
bootp;
authoritative;
#
Subnet definition
subnet
192.168.0.0 netmask 255.255.255.0 {
#
Parameters for the local subnet
option
routers
192.168.0.1;
option
subnet-mask
255.255.255.0;
option
domain-name
“Raju.com”;
option
domain-name-servers 192.168.0.1;
default-lease-time
21600;
max-lease-time
43200;
#
Client IP range
range
dynamic-bootp 192.168.0.100 192.168.0.200;
}
[root@server~]#service
dhcpd restart
[root@server~]#Chkconfig
dhcpd on
[root@server~]#mkdir
–p /var/pxe/rhel6
[root@server~]#mkdir
/var/lib/tftpboot/rhel6
Insert your RHEL 6 dvd and
Mount dvd to /mnt
[root@server~]#mount
/dev/cdrom /mnt
Check
the contents to see if it is properly mounted /mnt
ls
–l
copy
all the contents to the /var/pxe/rhel6 directory.
[root@server~]#cp
–ivr /mnt/* /var/pxe/rhel6
After
the file copy operation unmount and eject the dvd.
[root@server~]#umount
/mnt
[root@server~]#eject
copy
the vmlinuz and initrd.img files to the tftpboot directory.
[root@server~]#cp
/var/pxe/rhel6/images/pxeboot/vmlinuz /var/lib/tftpboot/rhel6
[root@server~]#cp
/var/pxe/rhel6/images/pxeboot/initrd.img /var/lib/tftpboot/rhel6
copy the menu file.
[root@server~]#cp
/usr/share/syslinux/menu.c32 /var/lib/tftpboot/
[root@server~]#vi
/var/lib/tftpboot/pxelinux.cfg/default
timeout
20
default
menu.c32
#Prepare
the boot menu.
menu
title ******BOOT MENU******
label
1
menu label ^ 1) RHEL6
kernel rhel6/vmlinuz
append initrd=rhel6/initrd.img ks=http://192.168.0.70/ks/ks.cfg
ksdevice=eth0
[root@server~]#chkconfig
httpd on
[root@server~]#service
httpd restart
create
new entry
[root@server~]#
vi /etc/httpd/conf.d/pxeboot.conf
Alias
/rhel6 /var/pxe/rhel6
Options Indexes FollowSymLinks
Order Deny,Allow
Deny from all
Allow from 127.0.0.1 192.168.0.0/24
#
Ip address you allow
[root@server~]#chkconfig
httpd on
[root@server~]#service
httpd restart
[root@server~]#mkdir
/var/www/html/ks
[root@server~]#cp
/ks.cfg /var/www/html/ks/ks.cfg
[root@server~]#chmod
644 /var/www/html/ks/ks.cfg
[root@server~]#chkconfig
httpd on
[root@server~]#service
httpd restart
The
pxe server is ready.
Plug
a computer into the network and boot it through LAN using pxe.
Leave Your Comment Below If You Like This Post


0 comments: